Important Note:
The information that is provided in this article is specifically designed for only admin users who are part of a sports team organization. If you're part of a different organization type, please click HERE to learn more about how you can set up your fundraiser.
Introduction:
This article is designed to walk through the most frequently asked questions (during & post-event) for sports teams.
WHAT IS THE DIFFERENCE BETWEEN USER ROLES?
HOW TO UPDATE USER INFORMATION?
HOW TO CHARGE A CREDIT CARD ON-FILE?
HOW TO ENTER OTHER FORMS OF PAYMENT?
HOW TO OFFER AN ITEM TO THE NEXT HIGHEST BIDDER AFTER THE AUCTION HAS BEEN CLOSED?
HOW DO I NOT OFFER AN ITEM TO THE NEXT HIGHEST BIDDER, IF THE WINNER DOES NOT WANT THE ITEM?
What is the Difference Between User Roles?
There are 2 levels of user roles: those that are assigned at the ORG HUB level, and those that are assigned at the campaign level.
ORG HUB Level User Roles (From the ORG HUB: select the 'Admin Tab')
Organization Admin
This user role will allow a user to access all features of your campaigns and ORG HUB.
**Limitations: You will not be able to close an auction with this access, nor will you be able to issue refunds
DIY Organization Admin
This user role will allow a user to access all features of your campaigns and ORG HUB.
This will also allow you to close and auction and issue refunds.
Campaign Level User Roles ( From the campaign site: View Admin>User>User Role)
Campaign Admin Login
This user role will allow a user to have full accessibility on that particular campaign site.
Campaign Assistant
This user role is given to those individuals that you wish to have access to only specific campaigns, is assigned in the campaign itself, and provides limited access for modifying items while not allowing them to see the financial reports on the Reports tab.
Volunteer
This user role will allow a user to have access for checking guests in and out, and will allow them to place bids or donations for guests.
User
This role is the default role given to all users registered for the campaign. This will allow the user to access only their account, and will allow them to update their profile.
How to Update User Information?
How to Update a User's User Name and Password?
If your user would like to bid via an alternative method besides their mobile device, then they will need to have a User Name and Password.
To assign a User Name and Password for your guest, please follow these steps:
Go to View Admin > Users
Select the user's name from the list
Click the Actions Dropdown arrow in the User Detail
Click Edit
In the field under 'Username', update this information with the users 1st and last name (no space)
In the 'Password' field, enter in a password for the user that has these criteria:
(EX: GiveSmart1! )
6 or more characters
1 symbol
1 number
1 capital letter
Please remember to re-enter this new password in the 'Confirm' field too
Click 'Save'
If everything has been entered correctly, then you will see a confirmation pop-up (see below)

If you see the 'Oh Snap' message, then this means that the User Name that you have selected for your user is already in use, and you will need to select an alternative User Name.

How to Update a User's Phone Number or Add an E-mail Address?
To update your user's phone number, follow the steps below:
Go to View Admin > Users
Select the user's name from the list
- Find the Mobile field in the User Detail
Enter the new mobile number
Click outside the filed for the info to auto save
- NOTE: The phone number is the unique identifier for each user and can only be used on one user profile.
To update your user's e-mail address, follow the steps below:
Go to View Admin>Users
Select the user's name from the list
Find the Email field in the User Detail
Enter the new Email address
Click outside the filed for the info to auto save
NOTE: The same e-mail address can be used on multiple user profiles.
How to Set an Auto Close for an Auction:
Auto close is a feature that allows you to close and reconcile all of your auction items at once. The auction will be closed automatically based on the end date and time set. If you would like to set an auto close so that you do not have manually close your auction, you can do so by following the steps below:
Select View Admin
Click Settings
Click Auction
Open Advanced Settings
Set both End Date and End Time
If you would like to display a countdown timer indicating when the auction will end on your auction pages select Show from the drop-down labeled, Auction Countdown. If you do not wish to display the close time, simply select Hide.
If you would like to enable an extended close time, you can do so by entering the amount of time you would like the auction to extend in the Extended Close field.
What is an Extended Close: If a bid is placed within this timeframe prior to the auction end date and time indicated above, the auction will extend by this amount of time until bids are no longer placed. For example, if you enter 60 (seconds) and a bid is placed within the last minute of the auction, the auction will extend by 60 seconds and will continue to extend, until there are no more bids placed for a full minute.
From the drop-down labeled Auto Close, select Auto Close
Click Save
How to Charge a Guest's Credit Card that is on file?
If a user has not checked out, but wants their transactions to be charged to their credit card on file, you can follow the steps listed below:
- Go to View Admin>Users>Checkout
- Search for the user's name
- Find User and click Begin Checkout
- You will see the details of their transactions appear
- Select Make a Payment
- If the user has a credit card on file, select the 'Card On File' option
- Select this option, then follow the prompts to complete the transaction.
**For more information regarding checkout, please click HERE.
How to Enter Alternative Methods of Payment?
If a user has not checked out, but would like to settle their account with an alternative form of payment besides a credit card, then you can follow the steps listed below:
- Go to View Admin > Users > Checkout
- Search for the user's name
- Find User and click Begin Checkout
- You will see the details of their transactions appear
- Select Make a Payment
- You now have 4 alternatives of payment that you can select:
- CASH: cash payments can be recorded with this payment method. Select this option, then click 'Pay'.
- CHECK: selecting this payment method will require you to enter the check # associated with this purchase. Select this option, enter the check number, then select 'Pay'.
- OTHER: this payment method allows your organization to track any unique arrangements worked out between your organization and your users. (EX: User is paying from a payroll deduction). Select this option, enter in any payment notes, then select 'Pay'.
- PLEDGE: if a donor promises to make a payment at a later date, you can mark their payment type as a pledge. Once the payment is received, and entered (either by an admin or the guest) this payment status will automatically update this payment status and remove the 'pledge' status. To use this option, select 'Pledge', enter any notes regarding the future payment, click 'Pay'.
**For more information regarding checkout, please click HERE.
How to Delete a Bid or Instant Item?
If a guest has not been checked out, then you can delete a bid or instant item by following the steps below:
Click Items
Search for the preferred item that you would like to remove a bid/instant purchase from.
Select the item
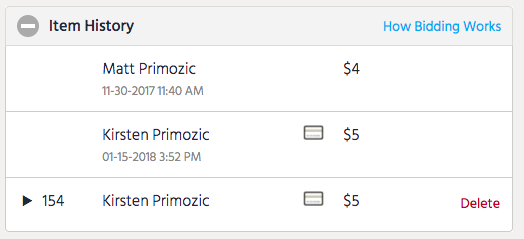
Scroll down to 'Item History' in the Item details
Locate the bid/purchase that you wish to delete
Click Delete
A box will appear where you can confirm your deletion.
Once confirmed you will receive verification that the bid was deleted successfully

How to Issue a Refund?
If a user has already been charged for an item, then a refund may be issued by anyone with DIY Administrative Access. To issue a refund, please follow the steps listed below.
Go to View Admin > Users > Checkout
Search for the guest's name, click View Order History
Select 'Request Refund' next to their payment
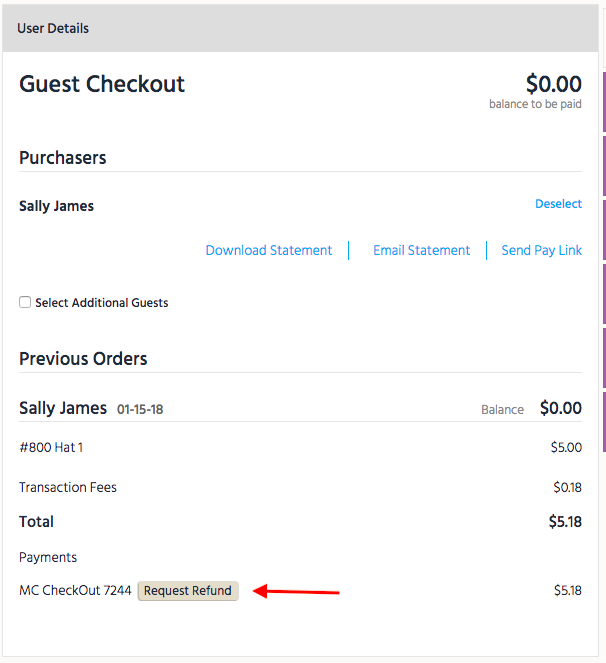
Once you select 'Request Refund', then a box will appear
Type in the amount that needs to be refunded, then select 'Issue Refund'
You will now see a remaining balance at the top of their cart
View the item numbers from the cart that you would like to delete
You will now need to delete the items from the guest's cart.
Go to Items
Select the item that needs to have the bid deleted
Scroll to 'Item History' in the Item detail
Delete the user's winning bid and final bid from the history (the 1st deletion deletes the time stamp for when the item was reconciled, the 2nd deletion deletes the time stamp for when the guest placed their final bid)
Once the bid has been deleted from the item, you can then verify that the user's cart is reflecting correctly
Go to the View Admin >Users > Checkout
Search for User and select Begin Checkout
Verify Order detail
You will then be able to see a $0 remaining balance for their cart


My Auction is Closed, and I had to Delete the Winning Bidder. How Can I offer it to the Next Highest Bidder?
If you have already closed and reconciled your auction, and followed the steps listed above for deleting a bid or issuing a refund, then you may be wondering how you can now offer this item to the next highest bidder. For items that have had the winning bidder deleted, and that have other bidders, you can offer it to the next highest bidder by following the steps below:
Click the Items Tab
Find the item with the winning bidder deleted
Scroll down to the 'Item History' in the item detail to find the new Highest bidder
Go to the Messages tab and click Text > +New Text
Send a custom message to the user, asking them if they are still interested in the item for the price that they last bid (Click here for directions on how to send a custom message)
you can place your phone number or e-mail address in this text message
or you can wait for them to reply via text to the event site. Go to:
View Admin > Messages
Text > Toggle to 'Sent'
Select 'Inbox' from the Filter By dropdown menu
When the guest replies, it will appear here
If the user would like to purchase the item, then click on the 'Items' tab
Select the item that you need to reconcile
Select 'reconcile' (This item will now appear in the user's cart)
Go to View Admin > Checkout
Search the user's name and click Begin Checkout
Then select the method of payment (For more details on how to checkout a guest click here)
I Deleted the Winning Bidder, But I Do Not Want to Offer This Item to the Next Highest Bidder.
If you have already closed and reconciled your auction, and followed the steps listed above for issuing a refund, then you may be wondering what to do if you do NOT want to issue the item to the next highest bidder. Follow the steps below to delete the item, and not offer it to the next highest bidder.
Click on the 'Items' tab
Select Item
Click 'Actions' dropdown arrow in Item detail
Click on 'Edit Item'
Scroll to the bottom of the screen and click 'Delete Item' button
A pop-up will appear asking you to confirm the deletion
Click 'Yes, Delete'
You will have successfully deleted the item, and NOT offered it to the next highest bidder