Users can be imported to a campaign through a user template available within your campaign or found here in this article. A user template upload should be done approximately 24-48 hours prior to the event. Edits to user accounts can always be made post upload directing on the campaign from User Details.
Watch a Video
Access User Templates
- From the Users Container within the Dashboard, click the More button ("···").
- Select Manage Users.
- From Users Details, click the More button.
- Choose import Users.
- Select the Template to download.
- Open the downloaded template, and save as an Excel.
- Add guest details.
Template Options
Each template includes a header row of what information can be imported to the campaign. The column titles found in the header row cannot be changed. Row 1 must remain as seen in order for the information to import correctly.
- User Template – USA Only
- User Template – Canada Only
- User Template – USA & Canada

User Template Fields
- First Name: (Required) User's first name.
- Last Name: (Required) User's last name.
- For unassigned guests within a party that needs to be uploaded.
- Guest of (First name) Party Name (Last Name).
- For multiple unassigned guests within a party that needs to be uploaded.
- Guest 1 of (First name) Party Name (Last Name), Guest 2 of (First name) Party Name (Last Name), etc.
- For unassigned guests within a party that needs to be uploaded.
- Phone: Cell phone number.
- The cell phone number is the unique identifier for each user and can only be used on 1 user account. Couples CANNOT share a cell phone number.
- Leave this field blank if you are not confident it is a cell phone number.
- Bidder #: Enter pre-assign bidder number or leave it blank if assigning at registration.
- Field1 & Field2: Custom fields assign values such as table numbers, starting golf holes, organization ID’s, etc. Visit User Settings to learn more.
- No special characters can be used in this field. No: /, &, #, \, etc. can be within the text of this field.
- Email: User's personal email address.
- An email address can be shared by more than 1 user.
- With the email added to a user account, when payment is received, an email receipt will be automatically sent to this email.
- Street/City/State/Zip: Users residential street address, city, state and zip code.
- Province/Code/Country Only for Canadian addresses. User's residential Province, Canadian code, and residential country.
Upload User Template
- From the Users Container within the Dashboard, click the More button ("···").
- Select Manage Users.
- From Users Details, click the More button.
- Choose import Users.
- Click Choose File under Upload CSV File and add saved User Template.
- Click Begin Import.
- Once users are successfully added, a User Upload Summary will appear.
- If there are any errors within any of the user fields, a notification is sent.
- Click on View Errors to see which users have missing or invalid details. Users with errors have not been uploaded to the campaign.
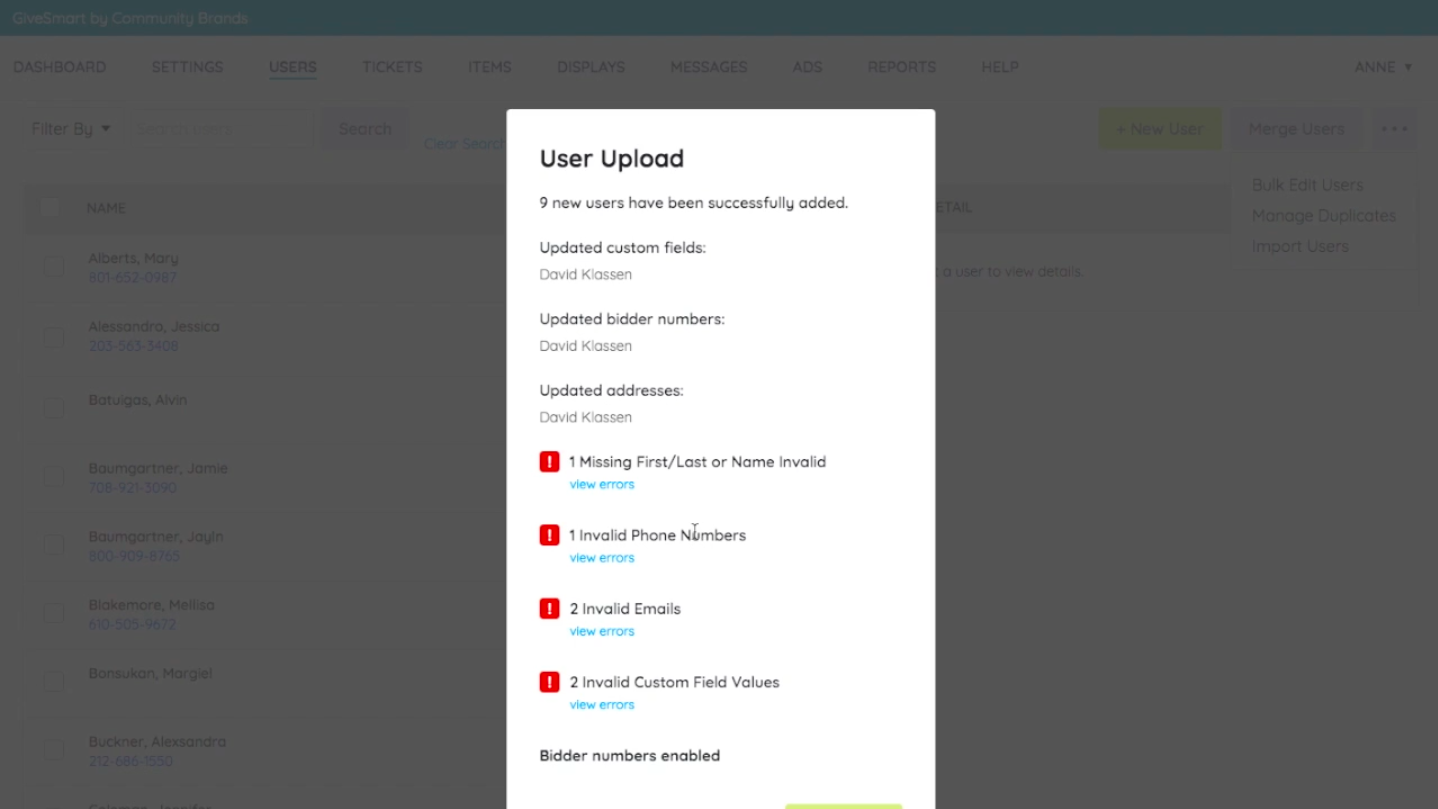
- Make the corrections and modify the spreadsheet to include only guests with errors to re-upload the users that were not successfully added.

Upload Additional Users
Create a new user template that includes these additional guests. DO NOT include any prior uploaded users or users already registered on the campaign.
Edit Imported User Accounts
- To edit Bidder Numbers, or Custom Fields, go to Dashboard > Users container > More ("...") > Manage Users. From Users Details, click the More button and select Bulk Edit Users.
- To make adjustments to email or address, go to Dashboard > Users container > More ("...") > Manage Users . From Users Details, search for the user, click on the user profile on the left to open up the user details on the right. From the details, click within the field to edit and click out of the field to save.
Visit Manage User Details for more information.
Duplicate User Accounts
Visit Merge Duplicate User Accounts for more information.